Thursday, August 23, 2012

Icy Cold Gazpacho

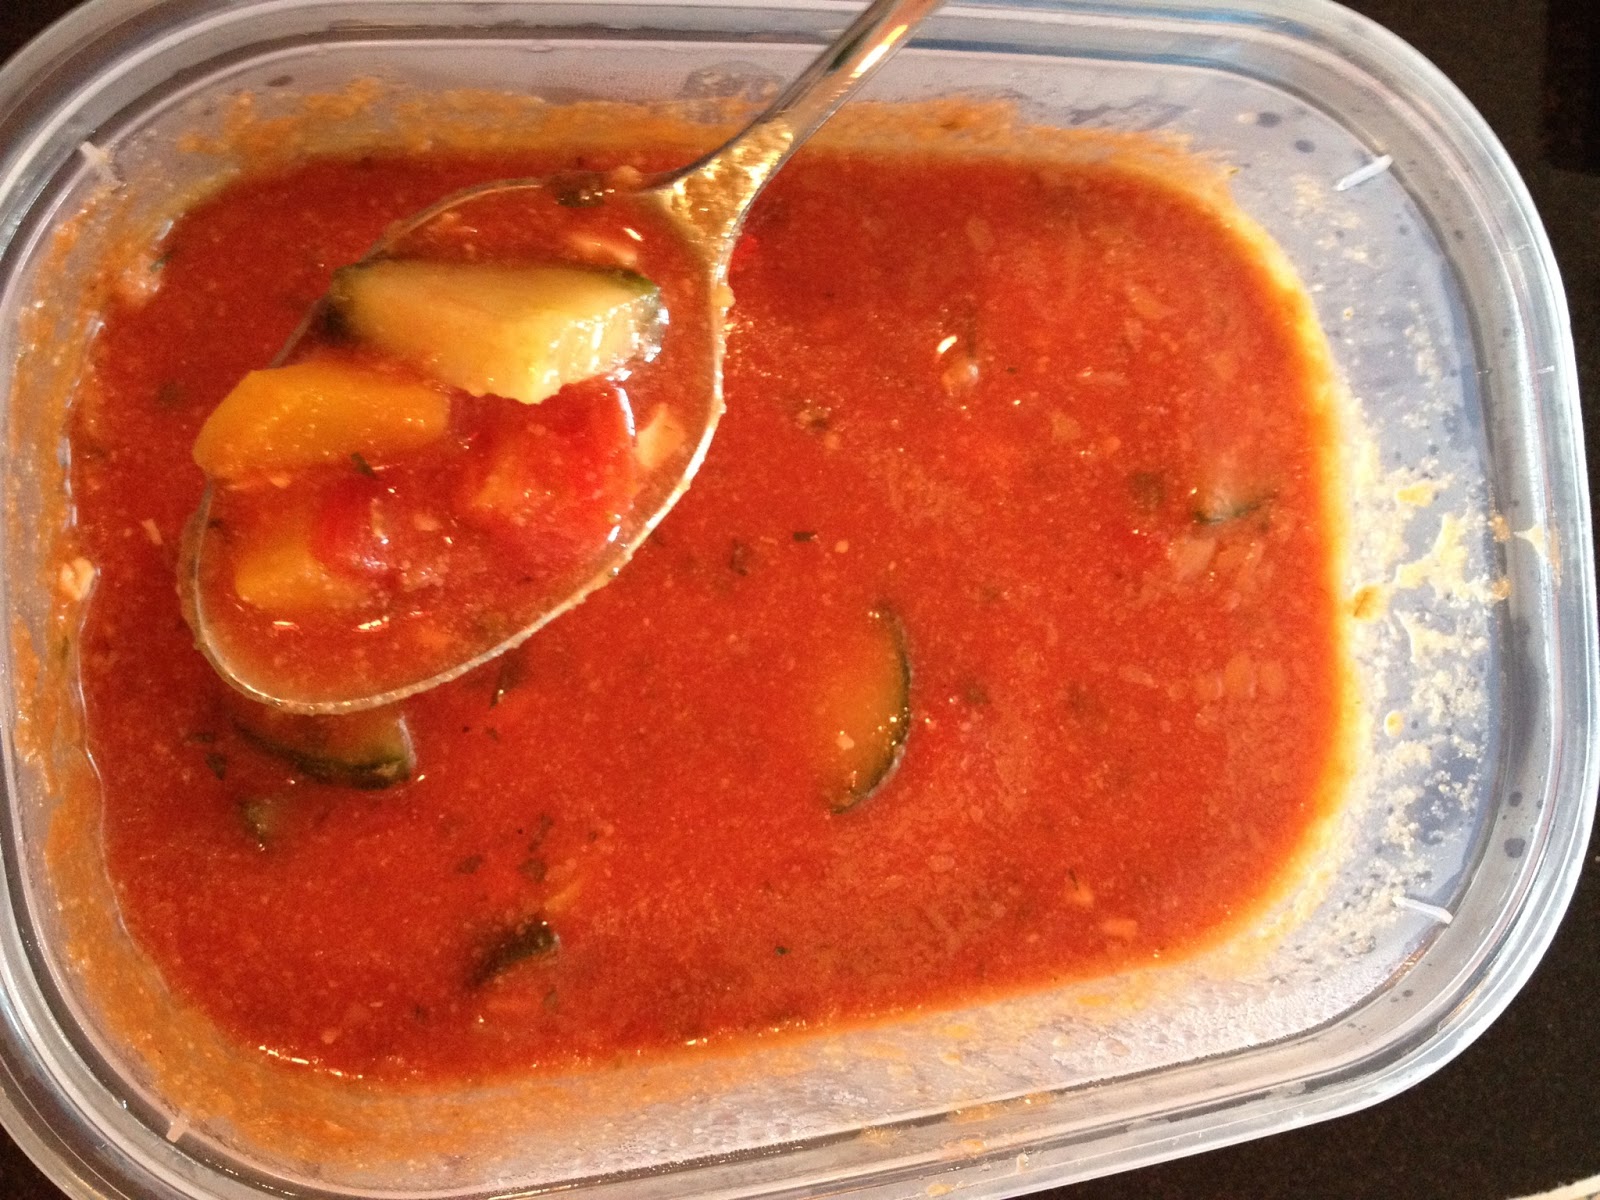
I am doing this one for my dear friend Laureen. When I heard that I was going to be eating cold soup, I was a bit disgusted, but I will always taste new food and thank goodness I did. I really love this soup. I didn't take step by step photos with this one because I didn't want to bore you with photos of cut veggies. This is extremely delicious and extremely easy. With no need for the oven, it's a great summer treat. Allow yourself a good 40-45 minutes for the preparation process, but all that cutting is well worth it. This recipe is from my cooking teacher, Art, the kitchen guru. 

I do not measure everything out perfectly, if the recipe calls for 1 cup of cucumber, I use the whole cucumber, if it asks for 1/2 cup of bell pepper, I use a whole bell pepper. I hate to waste good veggies. There is no rule for cutting the veggies up, just remember that this is a soup and all of these ingredients are going to be in your mouth, so don't cut off more than you can chew :)

1 egg
2 cups chopped fresh plum tomatoes
1/2 cup green or yellow pepper
1 cup chopped cucumber, seeds removed (or a seedless English cucumber)
1/2 cup finely chopped red onion
1/2 cup olive oil
Juice of 1 lemon
2 cups beef broth, optional (I leave this out)
1/4 cup red wine vinegar
1/4 cup finely minced parsley
1 tsp dried oregano
2 tbsp Worcestershire
Pepper, coarsely and freshly ground
2 cloves garlic, finely chopped
Salt
1 46 oz can tomato juice
1/2 cup fresh plain bread crumbs
Tabasco, to taste
Garnishes: Chopped parsley, minced red onion, chopped green onions

Place egg in a small pot of cold water, bring to boil, and let simmer for 1 minute, take off heat and let stand in water until water cools.

In a pot or large bowl, combine tomatoes, pepper, cucumber, red onion, olive oil, lemon juice, cold beef broth (if using), red wine vinegar, parsley, oregano, Worcestershire, and coarsely ground black pepper to taste. Stir.

Sprinkle garlic with a pinch of salt and set in bowl.

When egg is finished cooking, run under cold water, remove shell, add to garlic and salt mixture, and smash together with a fork.

Pour tomato juice into large pot or bowl with veggies and add garlic, egg, and salt mixture. Add bread crumbs and stir so that they dissolve into liquid.

Taste for seasoning and salt and pepper, and Tabasco to taste. Chill for at least 4 hours and serve. Garnish with chopped parsley, minced red onion, and chopped green olives if desired.

I think the olives are the best garnish for this dish. They give it such a great kick.


Enjoy!!!

Pin It

Monday, August 20, 2012

Potato, Pepper, and Lamb Empanadas

We made empanadas in my cooking class a few months back and I am finally getting around to trying them on my own. The recipe is my cooking teacher, Art's. It is really delicious and I love the crust in this one. This is a great weekend recipe because it does take awhile to prepare, but it can be frozen and it is really delicious. This recipe is totally versatile. Usually empanadas are made with Chorizo sausage, but I don't really care for the taste of it so I decided to give ground lamb a try. You could do this with Italian sausage or Andouille sausage, or ground beef or chicken. You could leave the meat out all together and add different veggies like broccoli or asparagus or even feta cheese. You could go in a different direction and use pepperoni and cheese and make a hot pocket with the dough recipe. You just want to make sure all ingredients are finely chopped so they will fit into the crust. You are the boss here, recipes are only guides. You do not have to stick to them by the ingredient. 

I used my food processor for the dough, but if you do not have one, you can still make it. The recipe for that is at the bottom of this post with the complete recipe. The best way to cut your butter is to put it in the freezer for about 20 minutes. Cut long ways into thirds, flip it and cut that side into thirds, then chop the short end into small cubes. Add flour, salt, and butter into processor and pulse until mixture has pea-size butter lumps. Beat together egg, water, and vinegar in a small bowl with a fork. Pour into flour mixture and pulse until dough has come together into a ball. Turn out mixture onto a lightly floured surface and knead gently with the heel of your hand once or twice, just enough to bring dough together. Form dough into a flat rectangle and chill, wrapped in plastic wrap, at least 1 hour.

Making the dough
For the filling, brown whatever meat you decide to use in a skillet until cooked through. Drain the grease from the meat in a colander once meat is finished cooking.

Ground lamb cooking

Add your finely chopped onions to the same skillet with a few drizzles of EVOO and cook until yellow and tender, about 15 minutes.

Onions cooking

When onions are yellow and tender, add bell pepper (whatever color you like), two bay leaves, salt, garlic, and oregano. When you add the oregano, put it in the palm of your hand and rub it together with your other hand and let it drop in the pot. This will 'wake it up'. Cook until peppers are tender, about 15 minutes. Add more EVOO if needed.

Onions, bell pepper, garlic, salt, oregano, and bay leaves

For my salt, I had made some basil salt the other day so I used this. All you do is add 1/4 cup Kosher salt and 1/4 cup packed, fresh basil leaves in a food processor, process until basil leaves are shredded, put mixture in a 350 degree F oven for 40 minutes, stirring once half way through or until salt and basil are dry. Let cool then store in a salt shaker.

Basil Salt
When peppers are tender, add your finely diced potatoes to the onion mixture and cook over moderately low heat stirring frequently until potatoes are just barely tender (10-12 minutes). 

Potatoes, onions, bell pepper, garlic, salt, oregano, and bay leaves 

Add potato mixture and cooked lamb to a large mixing bowl and stir to combine. Cool filling to room temperature and discard bay leaves.

Cooling filling to room temp


Preheat oven to 400 degrees F. Divide dough into 12 equal pieces (the best that you can, it does not have to be perfect) and form each into a disk. 


Diving dough


Keeping remaining pieces covered, roll out 1 piece on a lightly floured surface with a lightly floured rolling pin into a 5" round (about 1/8" thick) disk.


Rolling a single disk


Spoon about 2 tbsp filling onto center and fold dough in half, enclosing filling. Empanadas should look like little half moons, but I like to leave mine more rectangled because I like the extra crust it makes on the ends.  


Adding the filling


Press edges together, then crimp decoratively with your fingers or tines of a fork. Transfer empanada to a baking sheet. Make 11 more empanadas in the same manner.


Crimping the edges of a filled empanada 

If you want to freeze your empanadas, stop here and put them in a freezer baggie. When you want to eat them, brush them with egg wash and put into the oven. Lightly brush empanadas with some of egg wash and bake in oven, turning baking sheet once half way through, until golden brown (about 25 minutes). 

All empanadas egg washed courtesy of one hungry husband 

Transfer empanadas to a rack to cool at least 5 minutes. Serve warm or at room temperature.

Fresh out of the oven!

Finally time to eat! 


Empanada Dough
2 1/4 cups unbleached all-purpose flour
1 1/2 tsp salt
1 stick (1/2 cup) cold unsalted butter cut into 1/2" cubes
1 large egg
1/3 cup ice water
1 tbsp distilled white vinegar

Sift flour with salt into a large bowl and blend in butter with your fingertips or a pastry blender until mixture resembles course meal with some roughly pea-size butter lumps. This can also be done in a food processor with the dough blade.
Beat together egg, water, and vinegar in a small bowl with a fork. Add to flour mixture, stirring with fork until just incorporated. (mixture will look shaggy.) If using food processor, dump mixture into flour and pulse until dough has come together.
Turn out mixture onto a lightly floured surface and gather together, then knead gently with the heel of your hand once or twice, just enough to bring dough together. Form dough into a flat rectangle and chill, wrapped in plastic wrap, at least 1 hour.

Empanada Filling
1 lb ground Lamb
2 tbsp EVOO
1 onion, finely chopped
3 garlic cloves, finely chopped
1 bell pepper, finely chopped
2 bay leaves
1/2 tsp salt
1/4 tsp dried oregano, crumbled
2 medium Yukon Gold potatoes, finely chopped
1 egg lightly beaten with 1 tbsp water (this is for the egg wash)

Make filling:
Cook lamb in a skillet over medium heat until it is no longer pink. When cooked through, transfer to a collander and drain grease. Add onions and EVOO to skillet and cook, stirring frequently, until golden and very soft (about 15 minutes). Add garlic, bell pepper, bay leaves, salt, and oregano and cook, stirring frequently, until peppers are very soft (about 15 minutes). Peel potato and cut into 1/2" pieces, then stir into onion mixture and cook over moderately low heat stirring frequently until potatoes are just barely tender (10-12 minutes). Add potato mixture and cooked lamb to a large mixing bowl and stir to combine. Cool filling to room temperature and discard bay leaves.
Form and bake empanadas:
Preheat oven to 400 degrees F. Divide dough into 12 equal pieces and form each into a disk. Keeping remaining pieces covered, roll out 1 piece on a lightly floured surface with a lightly floured rolling pin into a 5" round (about 1/8" thick) disk.
Spoon about 2 tbsp filling onto center and fold dough in half, enclosing filling. Press edges together, then crimp decoratively with your fingers or tines of a fork. Transfer empanada to a baking sheet. Make 11 more empanadas in the same manner.
Lightly brush empanadas with some of the egg wash and bake in oven, turning baking sheet once half way through, until golden brown (about 25 minutes). Transfer empanadas to a rack to cool at least 5 minutes. Serve warm or at room temperature.Pin It

Friday, August 17, 2012

Popcorn Bag Birthday Cake

My husband loves popcorn, so for his birthday I wanted to make him a popcorn cake. Having never worked with fondant or even attempted to make a 'fancy' cake before, I wasn't really sure what to expect. I went to Michael's to get the fondant and was excited to see that Chef Duff has his own line of cake mix, fondant, and icing! We loved watching Ace of Cakes when it was on Food Network so I had to get his products so we could say that we ate a Duff cake.


I greased a 9 x 13" square pan with cooking spray

I followed (almost) the exact instructions on the cake box. They are a little hard to read here so what it says is...

First: Preheat oven to 350 degrees F. Generously grease one 9" round pan and dust with flour or spray with non-stick cooking spray. (I used a square 9 x 13" pan) You will need two 1/4 cup scoops, one for chocolate and one for white cake batter. (I used 1/3 cup scoop for chocolate and 1/4 cup scoop for white because I did not have two 1/4 cup scoops.)
Mix: Prepare cake batters.
Chocolate cake mix:                                                      White cake mix:
2/3 cup water                                                                 2/3 cup water
1 large egg                                                                     1 egg white
1/4 cup oil                                                                      2 tbsp oil
Blend in separate bowls at low speed until moistened. Beat 2 minutes at medium. (I used my stand mixer for one and an electric hand mixer for the other.)
Pour: Start with the chocolate batter. Put one scoop into the center of the pan and let it spread out by itself. Do not touch the batter once in the pan. Next, put a scoop of the white batter in the center, on top of the chocolate batter. Continue to alternate the batters, working quickly and letting each scoop of batter spread out evenly on its own. It should look like chocolate and white circular rings on top when finished. (My batter did not want to spread in the pan so I helped it along by tilting the pan around in small circles after I poured in the batter.)
Bake: Bake for 50-55 minutes at 350 degrees F. Let cool for 15 minutes before removing from pan. (Mine was ready in 50 minutes.)


Chocolate and vanilla layers

Finished with the batter!
When the cake was done, I removed it from the oven, let it sit in the pan for 15 minutes, then moved it over to a cooling rack to cool almost completely before spreading the icing.

Hot out of the oven!
Spread icing all over the cake with a butter knife or icing spatula so the fondant will adhere to the cake. 

My icing

Microwave your fondant for 10 seconds per pound to soften. You will want to roll it out with your roller so it is approximately 1/3" thick. The thicker your fondant the heavier it will be. If it is too heavy it could cause your cake to collapse. It can also get hard to slice through if it is too thick. If fondant is too sticky, you can sprinkle a small amount of powdered sugar or corn starch on your work surface to absorb some of the stickiness and the white of the starch or sugar is easily wiped off of the fondant with your fingers. 

White fondant
Once the fondant has been rolled out, use your dough knife (photo in case you are unsure what this is) http://0.tqn.com/d/cookingequipment/1/0/-/9/-/-/DoughScraperSurLa.jpg to get it from off of your counter to on top of your cake. Be gentle and use the palm of your hands to work with the fondant versus your fingertips as it can easily stretch or break apart.  


Gently lay white fondant over your cake and trim the edges with your dough knife. As you can see, my fondant ripped on me on the front right end of the cake. I patched it up using another piece and smoothing it over the hole and by the time the red stripes were added on top, it was barely noticeable.


Roll out the red fondant into a thin layer the same way as the white was done but cut it into strips using a dough knife as wide as you like. Put a few dots of icing on one side of the strip so it will stick to the white fondant and lay the strips over the white fondant. Trim the overhang of the strips with your dough knife.

Red fondant

Progress pic! 
I popped a handful of popcorn kernels and placed them on the top end of the cake to make it look like the corn was spilling out of the bag. 


Side view

The zebra lines on the inside

Overall, I would definitely get Duff's fondant again, but probably not the cake mix. At $8 a box I can't say it's better than Dunkin Hines or Betty Crocker. The cake was very crumbly, however, after a night in the refrigerator it did not crumble as much the second day and it did taste slightly better than the first night. The raw cake batter was tastier than your average grocery store cake box, but I wouldn't recommend eating too much of it as there are raw eggs in there. Next time I think I will opt for a cake from scratch. I am not super crazy about the taste of fondant, but the birthday boy liked it very much so that is all that counts. Pin It

Honey Butter Pork Tenderloin

This is an extremely easy and delicious dinner with little clean-up. I love pork tenderloin. This made 4 servings for me and was ready quickly. Because you are using honey and butter, generally you want to get a pork loin that has not been marinated with extra flavors, but all I had in the fridge was Peppercorn so that is what I used. If you like, you can just sear this and stick it in the oven as is, but I like the taste that the butter and honey add.

My Pork Loin 

Preheat oven to 350 degrees. Add 4 tbsp of butter and 2 tsp of honey to an oven proof skillet on medium high. Melt together, then add pork loin. Sear pork loin on both sides.

Pork loin in skillet
When the pork has a good sear on one side, turn it over. 

Time to flip!

Put your pork loin in a 350 degree oven for 25-30 minutes. Internal temperature should be 145 degrees and pork can be slightly pink. When you take the pork out of the oven, let it rest on a cutting board with tin foil over it for 10 minutes before slicing.


Honey Butter Pork Loin

4 tbsp butter
2 tsp honey
1 pork loin

Preheat oven to 350 degrees. Melt butter and honey together in an oven proof skillet on medium high. Sear pork on both sides (about 3-5 minutes each side). Put in preheated oven and let cook for 25-30 minutes or until internal temperature has reached 145 degrees. Let pork rest on a cutting board with tin foil placed on top for 10 minutes. Slice, serve, enjoy!Pin It

Tuesday, August 14, 2012

Fried Green Tomatoes with my take on Remoulade Sauce‏

I was looking all over for green tomatoes and they were nowhere to be found so my cooking teacher so nicely brought me some out of his garden. I really wanted fried green tomatoes badly and needed to make them before they turned red. I did not have any cornmeal, but chose to make them anyway and they still turned out nicely! 

Slice tomatoes in 1/2" thick slices. Line them on a paper towel and sprinkle with salt to drain excess juice. Let them sit for 15 minutes. 


Whisk 1/2 cup buttermilk and 2 eggs together in one dish, a cup of flour in a second dish, and 1 cup breadcrumbs and 1 cup cornmeal in a third dish. I did not have any cornmeal, so I combined my breadcrumbs and flour in a dish together. This works fine in a pinch, but cornmeal is best.  Let tomato slices sit in the buttermilk and egg mixture for 10 minutes prior to frying to soften them up a bit.


Dip slices into flour, then buttermilk/egg mixture, then into cornmeal/breadcrumb mixture. Fry slices in reserved bacon fat on med-high heat approx 3-5 minutes per side. Add more bacon fat as needed. Sides are ready to turn when they are golden brown. If you prefer not to use bacon fat, vegetable oil works also.


When tomatoes are finished, top with Remoulade sauce and serve! 


Fried Green Tomatoes:

4 large green tomatoes

  • 2 eggs
  • 1/2 cup buttermilk
  • 1 cup all-purpose flour
  • 1 cup cornmeal
  • 1 cup bread crumbs
  • 2 teaspoons coarse kosher salt
  • Reserved bacon fat for frying

  • Slice tomatoes 1/2 inch thick. Do not use the ends.
  • Whisk eggs and milk together in a bowl. Scoop flour onto a plate. Mix cornmeal and bread crumbs in another bowl. Dip tomatoes into flour to coat. Then dip the tomatoes into milk and egg mixture. Dredge in breadcrumbs to completely coat.
  • In a large skillet add a scoop of bacon fat. Let this melt over a medium-high heat. Place tomatoes into the frying pan in batches of 4 or 5, depending on the size of your skillet. Do not crowd the tomatoes, they should not touch one another. When the tomatoes are browned, flip and fry them on the other side. Drain them on paper towels.


Generally, Remoulade sauce has scallions, onions, celery, parsley, and horseradish sauce. I didn't have any of those things, so I got as close as I could and the sauce I ended up with was really great.

Remoulade Sauce:
Add 1/2 cup mayonnaise, 2 tablespoons whole grain mustard, 2 tablespoons ketchup, 1 tablespoon fresh lemon juice, 2 cloves garlic, 1 teaspoon paprika, 2 teaspoons hot sauce, 1/4 teaspoon fresh ground black pepper, and 6 leaves of basil into a food processor. Process in food processor until combined.


Serve sauce on top of fried green tomatoes.


Pin It

Thursday, August 9, 2012

Philly Cheesesteaks

My bestie came for a visit a few weeks ago and we had cheesesteaks. Ever since, I have not been able to cure my craving for one so I decided I would make a batch. This is an extremely easy meal, takes 30 minutes to cook, and has minimal dishes. This particular version made 3 servings. You can manipulate this recipe to suit your taste buds. If you love garlic, use more than two cloves, if you hate it, don't use any. If you like mozzarella (or any other cheese) more than provolone, use it. More peppers and onions? Don't mind if I do! I don't have a true recipe for this, but this is what I did.

Ingredients
I used two skillets, one for meat and a second for the peppers/onions. 

I used round tip steak for this recipe

Add a few drizzles of EVOO to your meat skillet and 3 tbsp of butter to your veggie skillet, turn the heat on medium for both, while waiting for the oil to get hot and the butter to melt, cut up your onions and peppers in the size that you like. I used red peppers because I am not crazy about the taste of green peppers, but most people will use green peppers on cheesesteaks.

1 red bell pepper and 1/2 onion

Add peppers and onions to the butter to caramelize. After they are added, chop up your meat to the size you like. The veggies will take slightly longer than the meat to cook.


I used the micro plane grater to grate two cloves of garlic in with my meat. I chose to cut my meat into cubes. Stir it occasionally until it has browned.


I added the veggies to my meat after everything was done so the flavors could get to know one another before they landed in my belly.


I scooped meat, veggies, and the good sauce that was at the bottom of the pan onto a hoagie roll. Added two pieces of provolone cheese to the top, microwaved for 15 seconds to allow the cheese to melt, then ate it up. 


Philly Cheesesteaks

3 tbsp butter
2 tsp EVOO
2 cloves garlic
1 onion
1 bell pepper
1 lb round tip steak
provolone cheese

Slice onion and pepper and add to melted butter to caramelize. Cook steak with minced garlic until browned. Add cooked pepper and onion to cooked steak and stir. Spoon on top of a hoagie roll and top with two slices of provolone cheese. Melt in microwave for 15 seconds. Enjoy! Pin It

Monday, August 6, 2012

Lemon Blueberry Cheesecake Cookies

Because you can never have to many cookies in the house, I really wanted to try these cheesecake cookies I found on http://hotpolkadot.com/. This is a beautiful blog with some wonderful looking stuff! I love lemon, I love cheesecake, and I don't hate blueberries. Win, win, win! 

Cream your butter and sugar (sugar on bottom) with the paddle attachment in your mixer's mixing bowl. Once creamed, add lemon zest, lemon juice, and eggs. Scrape everything down. In a large separate bowl, add baking soda, baking powder, salt and flour. Slowly mix dry ingredients into wet ingredients adding a little dry at a time. 


Fold in blueberries trying not to burst any. Stick dough in the fridge for 20-25 minutes to make it stiff enough to roll. This is a very sticky dough.

For me, wet hands worked best, re-wetting every third cookie. Get a ball of dough, flatten it in your hands, take a spoon and dip out a ball of cream cheese. Roll the dough around the cream cheese to form a ball. Place ball on a parchment paper lined baking sheet. My cookie dough balls were about 1.5" wide. Make sure you have an even amount of blueberries in each cookie. Some of my cookies were packed with blueberries while others only had 1 or 2.

Bake in a preheated 350 degree oven for 10-15 minutes depending on the size of your cookie dough balls. Mine went a little longer (25 minutes) because they were larger than the original author of this recipe. 
Hey, who took a bite out of my cookie?

Cool cookies before packing them up!

This made 25 cookies for me. They were delicious!!
Yum!
Next time I would probably add a bigger scoop of cream cheese and the zest of a second lemon because I love it so. I think this would also be awesome with strawberries or cherries. 


1 cup unsalted butter, room temperature
1 cup granulated sugar
Zest of 1 lemon
3 tbsp lemon juice
2 eggs
1/2 tsp baking soda
1/2 tsp baking powder
1 tsp salt
3 cup flour
1 cup blueberries
1/2 pkg cream cheese, cut into 1 tsp cubes

Preheat the oven to 350 degrees and position a rack in the center. Line your baking sheets with parchment paper and set them aside.
In a large bowl with an electric mixer cream together the butter and sugar until it's light and fluffy. Blend in the lemon zest, juice and eggs. Make sure to scrape off any bits of zest that stick to the mixer paddle.
In a separate bowl whisk together the baking soda, baking powder, salt and flour then mix it into the wet ingredients. Gently fold in the blueberries so as not to burst any. Refrigerate the dough for about 15 – 20 minutes to make it stiff enough to roll.
For each cookie, roll 1 heaping tbsp of dough into a ball then flatten it slightly into a disc shape. Place a 1 tsp cream cheese cube into the center and form the dough around it creating a ball again. Bake them for about 10 - 14 minutes until the edges brown slightly. Transfer them to a cooling rack and enjoy!
Pin It